Do a Device Scan when a partition or logical drive has been deleted or damaged. In other words, use it when you are unable to locate a drive listed under My Computer.
A Device Scan processes the surface of the physical device trying to locate all possible logical drives and partitions, whether they are existing, damaged or deleted.
There are two types of device scan, as described below:
Advanced Device Scan reads each hard drive track and looks for the boot sectors of deleted or damaged partitions. If found, a boot sector is interpreted as a drive. You can scan it and the look for deleted files and folders.
Low Level Device Scan reads each hard drive sector looking for boot sectors and tries to reconstruct drive structures based on remnants of the drive's system structures that it finds. This is very slow process but usually detects more partitions.
To perform a Device Scan follow the steps below:
From the UNERASER / DOS Console main screen, choose a physical device or partition that contains your data. It may be a hard disk drive or a floppy disk drive.
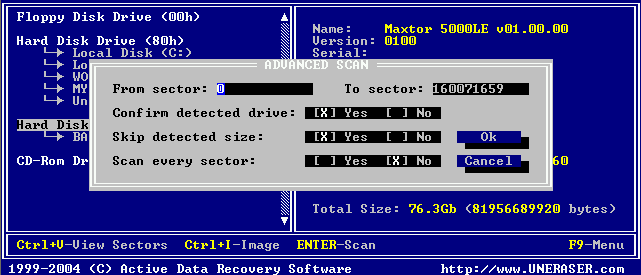
Press [F9] > Scan > Advanced Device Scan or press [Enter] to start the Advanced Device Scan. The Advanced Scan dialog box appears.
Alternately, press [F9] > Scan > Low Level Scan or press [Ctrl]+[Enter] to start the Low Level Device Scan
Specify scanning parameters using [Tab] and arrows keys. Press [Enter] to start the scan. Press [Esc] to close this dialog box and return to a previous screen. Use the descriptions below to help configure the device scan:
From sector: - To sector — If you know the approximate sector location, enter a range here to reduce scanning time.
Confirm detected drive - Yes (default) = If a new drive is detected during a device scan, a dialog box appears and waits for an answer whether to add the new device to the tree or not. No = Any newly detected device is added to the tree automatically with no human interaction.
Skip detected size - Yes (default) = If a new drive is detected during a device scan, the size of the device is calculated and the area is not scanned (it is skipped). Scanning continues past the boundary of this new device. No = The new device is scanned.
Scan every sector - Usually a Drive Boot Sector is located at the beginning of each track (every 63rd sector). Yes = Scan every sector (slow). No (default) = Scan every track (63 times faster).
After the scan starts, you can watch the progress bar and wait until the device scan is finished. You can cancel the operation anytime by pressing [Esc].
After the device scan is complete, all detected partitions and logical drives appear. These drives are ready for the Drive Scan process the same way as with regular drives.