QuickScan searches for files, folders and partitions being just deleted. If you are looking for deleted files and folders, you must scan the existing drive (logical disk or volume) to detect files and folders being deleted. If you are looking for deleted partitions and volumes, you must scan unallocated space to detect the drive being deleted.
There are two methods for scanning: QuickScan and SuperScan.
|
QuickScan is a fast and basic scan. Partitions and files that have just been deleted most likely will be detected using this method (if no other partition has been created in unallocated space). |
|
SuperScan is a much slower and thorough scan. It processes the whole hard drive surface detecting all possible deleted data. After running QuickScan, if you haven't found proper partition or files, try SuperScan. For more information on SuperScan, click the link at the bottom of this topic. |

QuickScan Plus is an advanced version of QuickScan. It processes more unallocated space where deleted data assumed to be located, so it is a bit slower than QuickScan, however it detects more deleted files and folders. QuickScan Plus is still faster comparing to SuperScan (which processed all available disk space: unallocated and currently allocated).
After the regular QuickScan for the particular volume completed, toolbar button label and related menu items change to QuickScan Plus.
This means that if you scan the same object one more time, some advanced features of QuickScan will be activated. It will take a bit more time, however it could detect more deleted files and folders.
Advanced features include looking for files beyond the "live" system areas (current MFT area on NTFS, or directories tree on FAT).
Moreover, for transactional file systems, like NTFS, Log File ($LogFile) and User Journal ($UsnJrnl$) are processed to get more information about recent transactions (deleting, renaming,...). This could be very useful when you quick-formatted your hard drive or USB flash disk.
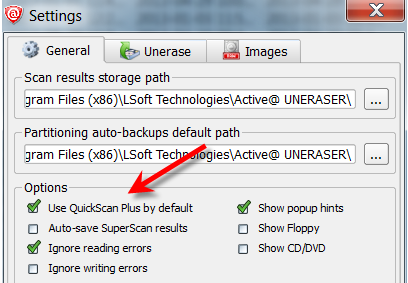
To change default action for QuickScan button and menu item to use QuickScan Plus always, open Settings, and on the General tab mark Use QuickScan Plus by default option:
You can tell the state of your files by the color of the icons:
Blue icon shows an existing file |
|
You can tell the state of your folders by the color of the icons: | |
 |
Blue icon shows an existing file |
|
Yellow icon shows an existing folder |
 |
Grey icon shows a deleted folder |
You can tell the state of your partitions by the color of the icons: | |
 |
Grey or Green icon shows an existing partition |
 |
Grey icon with Green box shows a deleted partition has a good integrity status and that can be safely recovered |
 |
Grey icon with Brown or Red box shows a deleted partition that can be recovered, however this partition might has been formatted before deletion or has some other damage |
After you complete the drive scan, to locate your deleted partitions, just look under Unallocated Space nodes. If new partitions appear there - inspect them (click on icon) and verify their content browsing the files and folders.
You can inspect the content of the file by selecting the file and clicking Preview toolbar button, or executing Preview command from the context menu, or by pressing Alt+P key combination.
If you are looking for deleted files and folders, to locate them, you may search either manually, by opening folders in the tree, or automatically, using the search mode.
If you satisfied with results, select an object (file, folder or partition) proceed with a recovery (click Unerase toolbar button).
This document is available in PDF format,
which requires Adobe® Acrobat® Reader
(Free download):
